How to Make a Sprite Move in Scratch for Beginners (Kids 8+) | Juni Learning
How to Get Started
This article will teach you how to make a sprite move in Scratch, a free visual programming language.
To follow along, make sure to first do these steps:
- Make an account at the Scratch website, https://scratch.mit.edu.
- Read our What is Scratch coding article to learn more about how to use Scratch blocks.
- Create a new project and start reading!
Learning how to code in Scratch is the perfect introduction to computer science, and will make learning other programming languages much more intuitive. This is the perfect article to start your journey into computer science, as movement is one of the easiest things to code in Scratch!
What is Movement?
Movement is arguably the most basic function in any game. It’s the first thing you do when you start a new game, and it’s present in almost every game made in Scratch.
In real life, movement is the only way that we can interact with the world. Just by thinking about it, we move our arms and legs to walk or do anything that we want. Just like in real life, movement is the primary way that we interact with games. By pressing the arrow keys, players tell their characters to move around on the screen and complete tasks.

Because it can be used for almost anything, we should learn how to make sprites move before anything else. This is perfect for Scratchers who are just getting started, and want to make their own creations! The rest of this article will explain how to create a sprite and make it controllable.
We used this same method in our step-by-step tutorial on how to create a simple game in Scratch. If you’re new to Scratch, that’s another great article to check out!
Making a Sprite Move
Step 1. Select a Sprite.
To start coding in Scratch, we need to create something called a sprite. Every entity in a Scratch project is a sprite. These sprites are characters in your game, which can move around and execute code. By creating scripts for the sprites to execute, we can give them commands and tell them to do anything we want!
Right now, the only sprite in our project is the Scratch Cat, who is in every project by default. If you want to create a new sprite, you can click the Choose a Sprite button, found in the bottom right of the screen. If you simply want to make the cat move, you can skip ahead to step two.

Clicking this button should bring you to the Sprite Menu, a library of different sprites which you can use in your game. Click on whichever character you like, and Scratch will create them as a new sprite in your game.

For our project, we’ll use a hedgehog as our first sprite. This is one of the default sprites in the menu, so anyone that wants to can follow along! However, the code to make characters move works for any sprite. You should choose a sprite that sparks joy. Later on, you can expand your project by adding in a cool background and more characters.
Now that we’ve picked out a character for our game, we no longer need the Scratch Cat sprite. We can get rid of it by clicking on it in the sprite menu, then clicking the trash can symbol next to its menu icon.
Step 2. Program your sprite.
Now that we have a sprite, it’s time to make it controllable. To make your sprite move, we need to use Scratch blocks in order to create a simple script.
The easiest way to make a sprite move is to use Event Listeners. Check out this code block, which makes sprites move to the right:
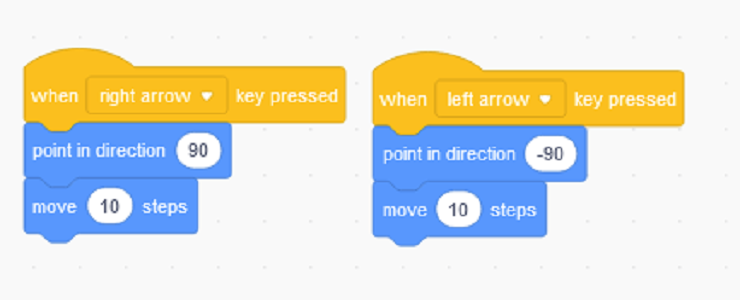
Here’s what this code says in plain English:
“When you press the right arrow key, point towards the right, then move forward 10 steps.”
The code consists of a yellow event listener block, followed by two blue motion blocks. The motion blocks actually move the sprite, while the event listener block tells the sprite when to move.
This movement works for any direction. By adding in more blocks like this, we can give our sprite the ability to move in any direction we’d like. Now that we can move to the right, let’s create more scripts to make our hedgehog move in all four cardinal directions!
▶ Tip: To make this process faster, you can right click on your existing code and click Duplicate. This will create a copy of these blocks, which means you don’t need to drag and drop as much.

Now we have scripts to move in all four directions. Let’s take a look at how our sprite moves in each direction. What are the differences between these four blocks of code?

Notice that for each direction, two things are different:
- The blocks run when different keys are pressed. For example, our character moves up when the up arrow key is pressed, and down when the down arrow key is pressed.
- The point in direction blocks specify different directions. The numbers in these blocks are degrees, which each represent one of the cardinal directions (right/left/up/down). When these blocks run, they tell our sprite to point towards a specific direction.
The move ten steps block remains the same for all four directions. No matter which direction we move in, we always move at the same speed.
▶ Experiment:
- Try changing the number inside of the move steps block. How does it affect your character’s movement?
- Instead of “move” blocks, you can alternatively use change x and change y blocks. Try to replace all your move blocks with change x / change y blocks!
Once you’ve made these four blocks of code, you’re pretty much done! You don’t even need to click the green flag — just press the arrow keys, and your sprite will move around!
Check out our example project to see this style of basic sprite movement code yourself.
Fixing Bugs
Something’s not quite right here. Even though our sprite is moving around properly, there’s something strange happening to its appearance.

When we push the left arrow key, our hedgehog sprite flips upside down! You might find that the same thing happens to you when you try moving to the left. Fear not, this is something that happens to everyone in Scratch. And there’s an easy way to fix it.
It may seem obvious to us that our sprite is not supposed to turn upside down, but Scratch doesn’t know that! Instead of understanding that our sprite is a character that moves left and right, Scratch treats all sprites the same and makes them rotate a full 360 degrees by default.
Because of this, we have to change our sprite’s rotation style. First, simply click on the “Direction” setting in the Sprite Menu.

Then, make sure the middle option is selected like in the screenshot below. This will change the sprite’s rotation style from “all around” to “left/right.”

face in the correct direction.
What’s Next: More Advanced Movement
Movement is the foundation of almost every game in Scratch. Now that you’ve got a controllable character, you can create anything you want!
However, you may notice that the way our character moves feels a little clunky. The sprite kind of stutters at first, and it takes a moment to start moving quickly in any direction. Additionally, we can’t move diagonally! We are limited to just the four cardinal directions.
Luckily, there is a method to make your sprite move that solves all of these problems. It’s more advanced, so we covered it in a separate article. Now that you understand how simple movement works, check out our article on How to Make a Sprite Move Smoothly to learn about this more advanced method.
If you’re okay with this simple style of movement, you can alternatively:
- Check out our How to Make a Scratch Game tutorial to build your own game around the project you started here.
- Explore more types of movement with our How to Make a Scratch Sprite Jump tutorial.
- Find more step-by-step Scratch project tutorials on our blog.
Keep Learning: Scratch Coding Classes for Kids

For structured Scratch learning, Juni Learning offers project-based Scratch Coding Courses for kids 8-11 to get started with coding. Our Scratch curriculum prepares students with full mastery of the Scratch environment, and prepares them to advance into coding with more advanced, text-based languages like Python.
- Game Superstar (Scratch Level 1 course): introduces computer science fundamentals such and teaches students how to build and design their own Scratch games.
- Game Master (Scratch Level 2 course: covers more complex concepts like nested loops, complex conditionals, cloning and more in preparation for learning more advanced coding languages.
Check out our online courses for kids coding, or contact our admissions team to learn which course is best for your student!
This article originally appeared on junilearning.com.